Multi-label emotion classification
👋 Giới thiệu
Tập dữ liệu
Để xử lý bài toán này, mình sẽ sử dụng một bộ dataset của Google có tên là GoEmotions. Tập dữ liệu này được lấy từ Reddit, đã được gán nhãn tuy nhiên chưa thông qua bất kỳ bước xử lý dữ liệu nào. Dưới đây là một vài thông tin về tập dữ liệu này:
- Số lượng samples: 58,009
- Số lượng nhãn: 27 + Neutral
- Training / Test / Dev size: 43,410 / 5,427 / 5,426
Multi-label vs multi-class classification
Dựa trên tập dữ liệu được cung cấp ta có thể thấy bài toán sẽ thuộc dạng multi-label classification. Lưu ý multi-label và multi-class là hai bài toán riêng biệt và có cách xử lý khác nhau. Dưới đây là sự khác biệt dễ nhận biết nhất:
- Multi-label classification là bài toán mà tại đó một training sample được gán với nhiều hơn 1 nhãn. Ví dụ: "OMG, yep!!! That is the final answer. Thank you so much!" - (gratitude, approval), "This caught me off guard for real. I'm actually off my bed laughing" - (supprise, amusement)
- Trong khi đó, Multi-class classification là bài toán mà tại đó một sample được gán với chỉ một nhãn. Ví dụ: Phân loại các loại chim, hay phân loại các loài hoa,...
Prerequisite
tensorflow==2.18.0
tf-keras==2.18.0
tensorflow-hub==0.16.1
tensorflow-text==2.18.0
nltk==3.9.1
emoji==2.14.1
🔨 Tiền xử lý dữ liệu
Sau đây là một số phương pháp tiền xử lý dữ liệu mình sử dụng cho bộ dữ liệu này:
- Loại bỏ các khoảng trống thừa
- Mở rộng các từ rút gọn
- Loại bỏ các từ dừng và lemmatization
- Demojize
Tải dữ liệu
Cấu trúc của tập dữ liệu sẽ có dạng như sau
train.tsv
test.tsv
dev.tsv
labels.txt
Hàm sau đây sẽ được dùng để tải dữ liệu:
def load_dataset(file_path: str):
    ds = []
    try:
        with open(file_path, "r", encoding="utf-8") as f:
            lines = f.readlines()
            for (i, line) in enumerate(lines):
                line = line.strip()
                items = line.split("\t")
                text_a = items[0]
                label = list(map(int, items[1].split(",")))
                ds.append({
                    "text": text_a,
                    "label": label
                })
            logger.info(f"Load {file_path} successfully")
    except FileNotFoundError as e:
        logger.error(e)

    return ds
Loại bỏ các khoảng trống thừa
stripped_x = " ".join(x.split())
Mở rộng các từ rút gọn
def expand_contractions(text):
    # Dictionary of English Contractions
    contractions_dict = { "ain't": "are not","'s":" is","aren't": "are not",
                     "can't": "cannot","can't've": "cannot have",
                     "'cause": "because","could've": "could have","couldn't": "could not",
                     "couldn't've": "could not have", "didn't": "did not","doesn't": "does not",
                     "don't": "do not","hadn't": "had not","hadn't've": "had not have",
                     "hasn't": "has not","haven't": "have not","he'd": "he would",
                     "he'd've": "he would have","he'll": "he will", "he'll've": "he will have",
                     "how'd": "how did","how'd'y": "how do you","how'll": "how will",
                     "I'd": "I would", "I'd've": "I would have","I'll": "I will",
                     "I'll've": "I will have","I'm": "I am","I've": "I have", "isn't": "is not",
                     "it'd": "it would","it'd've": "it would have","it'll": "it will",
                     "it'll've": "it will have", "let's": "let us","ma'am": "madam",
                     "mayn't": "may not","might've": "might have","mightn't": "might not",
                     "mightn't've": "might not have","must've": "must have","mustn't": "must not",
                     "mustn't've": "must not have", "needn't": "need not",
                     "needn't've": "need not have","o'clock": "of the clock","oughtn't": "ought not",
                     "oughtn't've": "ought not have","shan't": "shall not","sha'n't": "shall not",
                     "shan't've": "shall not have","she'd": "she would","she'd've": "she would have",
                     "she'll": "she will", "she'll've": "she will have","should've": "should have",
                     "shouldn't": "should not", "shouldn't've": "should not have","so've": "so have",
                     "that'd": "that would","that'd've": "that would have", "there'd": "there would",
                     "there'd've": "there would have", "they'd": "they would",
                     "they'd've": "they would have","they'll": "they will",
                     "they'll've": "they will have", "they're": "they are","they've": "they have",
                     "to've": "to have","wasn't": "was not","we'd": "we would",
                     "we'd've": "we would have","we'll": "we will","we'll've": "we will have",
                     "we're": "we are","we've": "we have", "weren't": "were not","what'll": "what will",
                     "what'll've": "what will have","what're": "what are", "what've": "what have",
                     "when've": "when have","where'd": "where did", "where've": "where have",
                     "who'll": "who will","who'll've": "who will have","who've": "who have",
                     "why've": "why have","will've": "will have","won't": "will not",
                     "won't've": "will not have", "would've": "would have","wouldn't": "would not",
                     "wouldn't've": "would not have","y'all": "you all", "y'all'd": "you all would",
                     "y'all'd've": "you all would have","y'all're": "you all are",
                     "y'all've": "you all have", "you'd": "you would","you'd've": "you would have",
                     "you'll": "you will","you'll've": "you will have", "you're": "you are",
                     "you've": "you have"}

    contractions_re=re.compile('(%s)' % '|'.join(contractions_dict.keys()))

    def replace(match):
        return contractions_dict[match.group(0)]

    expanded_text = contractions_re.sub(replace, text)

    return expanded_text
Loại bỏ từ dừng và lemmatization
- Từ dừng là những từ có tần suất xuất hiện nhiều trong văn bản nhưng không đóng góp nhiều về mặt ngữ nghĩa, ví dụ như: then / just, be, but, this, ... do đó loại bỏ những từ này giúp cho model không bị bias.
- Lemmatization là quá trình map từ ở nhiều dạng khác nhau về dạng gốc của nó giúp giảm số lượng từ , thường được dùng khi xử lý ngôn ngữ nước ngoài, còn với tiếng Việt thì không cần.
import nltk
nltk.download('wordnet')
nltk.download('stopwords')

from nltk.corpus import stopwords

stopword = set(stopwords.words("english"))
lemmatizer = nltk.WordNetLemmatizer()

def remove_stopwords_and_lemmatization(text):
    tokenized_x = text.split(" ")

    # Lemmatize + remove stopped words
    filtered_x = [lemmatizer.lemmatize(token) for token in tokenized_x if token not in stopword]
    filtered_x = ' '.join(filtered_x)
Demojize
Trong bài toán phân loại cảm xúc đặc biệt là từ các comments trên mạng xã hội, các biểu tượng cảm xúc là những đặc tính quan trọng mà chúng ta có thể sử dụng. Demojize là bước để chuyển từ một biểu tượng cảm xúc sang dạng văn bản có ý nghĩa hơn, ví dụ: 😢 => ":crying_face:"
import emoji

demojized_text = emoji.demojize(text)
Kết hợp lại
Sau đây là bản hoàn chỉnh:
def preprocess_data(ds):
    stopword = set(stopwords.words("english"))
    lemmatizer = nltk.WordNetLemmatizer()

    returned_ds = []

    # Process features
    for x in ds:
        # Remove extra space
        stripped_x = " ".join(x['text'].split())

        # Expand contraction
        expanded_x = expand_contractions(stripped_x.lower())

        # Demojize
        demojized_text = emoji.demojize(expanded_x)

        # Word tokenization
        tokenized_x = demojized_text.split(" ")

        # Lemmatize + remove stopped words
        filtered_x = [lemmatizer.lemmatize(token) for token in tokenized_x if token not in stopword]

        joined_text = ' '.join(filtered_x)

        returned_ds.append({
            "text": joined_text,
            "label": x['label']
        })

    return returned_ds
⛏️ Khai phá dữ liệu
Có 2 insights quan trọng mà chúng ta cần biết ở bước này:
- Điểm phân vị 95% trên toàn bộ chiều dài văn bản của tập dữ liệu.
- Kiểm tra xem class có bị mất cân bằng hay không.
Tìm điểm phân vị 95%
- Giá trị này rất quan trọng vì mình sẽ cần phải giảm chiều dài của một câu về cùng 1 độ dài nhất định, khi đó nếu chiều dài quá lớn sẽ có nhiều giá trị 0 được pad thêm vào trong câu làm cho số lượng tham số cần học tăng lên trong khi không thêm được quá nhiều giá trị, còn nếu quá nhỏ sẽ dẫn đến sự mất mát thông tin của những câu có độ dài lớn hơn.
import numpy as np

length_data = [len(x['text'].split()) for x in train_ds]
print(np.quantile(length_data, q=0.95))
Kiểm tra tính cân bằng của class
Việc này sẽ ảnh hưởng đến sự lựa chọn chỉ số đánh giá .
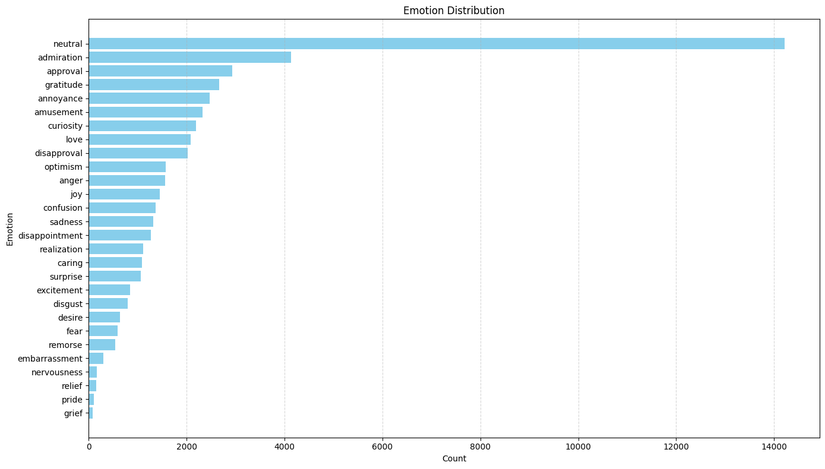
Dựa vào biểu đồ được cung cấp ta có thể thấy phân phối của class bị mất cân bằng khá nặng, nhãn 'neutral' xuất hiện nhiều nhất với hơn 14.000, xếp thứ hai là 'admiration lần và khoảng 4.000 lần. Trong khi đó nhãn 'grief' và 'pride' chỉ xuất hiện vỏn vẹn khoảng 77 và 111 lần cho mỗi nhãn tương ứng.
📈 Chỉ số đánh giá và hàm mất mát
- Mình sử dụng các chỉ số như macro-average F1, Recall, Precision, do các nhãn có độ quan trọng bằng nhau.
import tensorflow as tf

def classification_metrics():
    return [tf.keras.metrics.F1Score(
        name=f'f1_macro_average',
        average='macro',
    ), tf.keras.metrics.BinaryAccuracy("binary_accuracy"), tf.keras.metrics.Precision(name="precision"), tf.keras.metrics.Recall(name="recall")]
- Đối với hàm mất mát thì mình sẽ sử dụng binary_cross_entropy, các bạn có thể tự tính toán ở đây (khá dễ thôi) để hiểu tại sao nên dùng hàm mất mát này cho bài toán multi-label classification.
🔬 Training experiment
Bước này mình sẽ thử fine-tune mô hình BERT-base như trong paper.
Prepare data
import tensorflow as tf
from sklearn.preprocessing import MultiLabelBinarizer

binarizer = MultiLabelBinarizer()

def prepare_data(binarizer, ds, d_type):
    if d_type == "train":
        encoded_label = binarizer.fit_transform([x['label'] for x in ds])
    else:
        encoded_label = binarizer.transform([x['label'] for x in ds])

    tensored_features = tf.convert_to_tensor([x['text'] for x in ds])
    tensored_labels = tf.convert_to_tensor(encoded_label, dtype=tf.float32)

    return tf.data.Dataset.from_tensor_slices((tensored_features, tensored_labels)).shuffle(BertConfig.SHUFFLE).batch(BertConfig.BATCH_SIZE).prefetch(tf.data.AUTOTUNE)

train_dataset = prepare_data(
    binarizer, train_ds, d_type="train"
)
dev_dataset = prepare_data(
    binarizer, dev_ds, d_type="dev"
)
test_dataset = prepare_data(
    binarizer, test_ds, d_type="test"
)
Config
Dưới đây là phần config cho các mô hình cũng như phần huấn luyện như trên paper
class BertConfig:
    BERT_PREPROCESSOR="https://kaggle.com/models/tensorflow/bert/TensorFlow2/en-uncased-preprocess/3"
    BERT_MODEL="https://www.kaggle.com/models/tensorflow/bert/TensorFlow2/bert-en-uncased-l-12-h-768-a-12/2"
    SEQUENCE_LENGTH=14

class TrainingConfig:
    BATCH_SIZE=16
    EPOCHS=3
    LR=2e-5
    NUM_CLASSES=28
    SHUFFLE=42
BERT-base
import tensorflow_hub as hub

def build_bert_preprocessor():
    preprocessor = hub.load(BertConfig.BERT_PREPROCESSOR)
    text_input = tf.keras.layers.Input(shape=(), dtype=tf.string)
    tokenize = hub.KerasLayer(preprocessor.tokenize)
    tokenized_input = tokenize(text_input)
    packer = hub.KerasLayer(
        preprocessor.bert_pack_inputs,
        arguments=dict(seq_length=BertConfig.SEQUENCE_LENGTH)
    )
    encoder_inputs = packer([tokenized_input])

    return tf.keras.Model(text_input, encoder_inputs)

def build_bert_model(bert_preprocessor, bert_model):
    inputs = tf.keras.layers.Input(shape=(), dtype="string")
    encoder_inputs = bert_preprocessor(inputs)
    bert_outputs = bert_model(encoder_inputs)
    outputs = tf.keras.layers.Dense(BertConfig.NUM_CLASSES, activation="sigmoid")(bert_outputs["pooled_output"])
    model = tf.keras.Model(inputs=inputs, outputs=outputs)

    return model

bert_preprocessor = build_bert_preprocessor()
bert_model = hub.KerasLayer(BertConfig.BERT_MODEL, trainable=True)

model = build_bert_model(bert_preprocessor, bert_model)

model.compile(
    loss="binary_crossentropy",
    optimizer=tf.keras.optimizers.legacy.Adam(learning_rate=BertConfig.LR),
    metrics=metrics
)
model.fit(train_ds, epochs=BertConfig.EPOCHS, validation_data=dev_ds)
📶 Kết quả
Đây là kết quả huấn luyện trong đó đường màu vàng biểu diễn macro-average f1-score theo từng epoch trên tập val còn đường màu hồng là cho tập train.
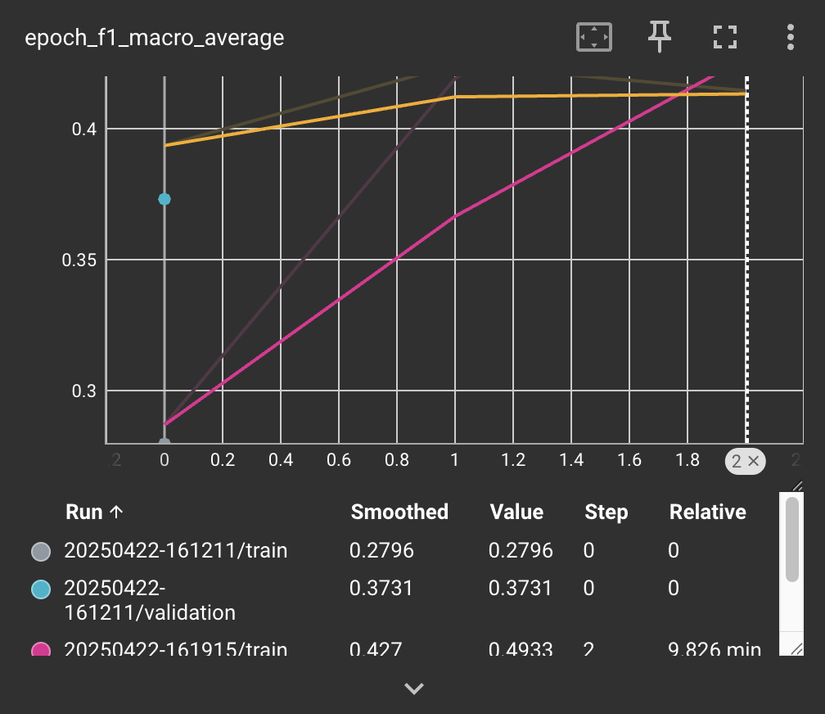 Còn kết quả macro-average f1-score trên tập test được 0.4235 thấp hơn khoảng 0.04 so với kết quả trong paper.
✏️ Kết luận
Mình mới chỉ thử mô hình BERT-base, tuy nhiên mọi người có thể thử các mô hình khác như RoBERTa, ELECTRA,... xem kết quẩ như thế nào nhé!
All rights reserved