[Terraform] [Lab 01] Triển khai EC2 bằng Terraform
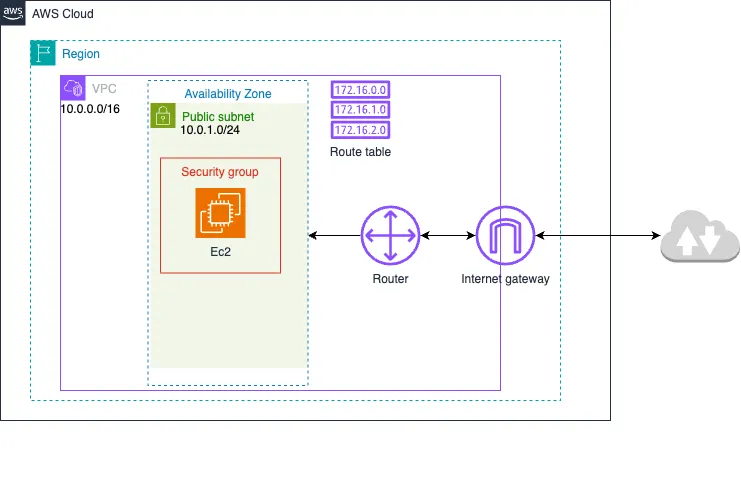
Cơ sở hạ tầng triển khai trên Cloud.
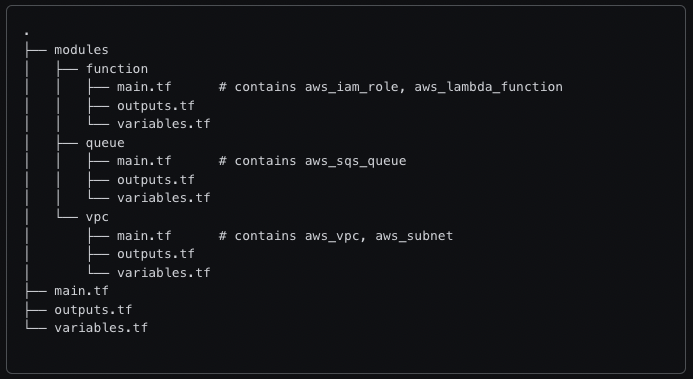
Xây dựng cấu trúc thư mục
- Theo gợi ý từ trang chủ của Terraform, ta sẽ xây dựng cấu trúc thư mục như sau:
-
Theo bài lab này, ta sẽ xây dựng 2 modules là
ec2vànetworking -
File
main.tfcủa thư mục root ta dùng đoạn code sau:terraform { required_providers { aws = { source = "hashicorp/aws" version = "~> 4.16" } } required_version = ">= 1.2.0" } provider "aws" { region = var.aws.region access_key = var.aws.access_key secret_key = var.aws.secret_key default_tags { tags = { Name = var.tag.name } } } -
Ta khai báo biến sử dụng và kiểu dữ liệu vào file
variables.tfvariable "aws" { sensitive = true type = object({ region = string access_key = string secret_key = string }) } variable "tag" { type = object({ name = string }) default = { name = "learning" } } -
Giá trị của
variables.tfđược lấy ởterraform.tfvars, biến môi trường sẽ có cùng kiểu dữ liệu được lưu ởvariables.tf# AWS Provider Configuration aws = { region = <AWS_region> access_key = <AWS_access_key> secret_key = <AWS_secret_key> } # Default Tag Name tag = { name = "learning" } # Networking Configuration networking = { vpc_cidr_block = "10.0.0.0/16" subnet_cidr_block = "10.0.1.0/24" } -
output.tf, sau khi triển khai hệ thống xong, sẽ xuất giá trị được khai báo trong file ra màn hìnhoutput "instance_public_ip" { description = "Public IP address of the EC2 instance" value = module.ec2.instance_public_ip }
Khởi tạo workspace
-
Sau khi đã khai báo xong, ta khởi tạo workspace
terraform initInitializing the backend... Initializing provider plugins... - Finding hashicorp/aws versions matching "~> 4.16"... - Installing hashicorp/aws v4.67.0... - Installed hashicorp/aws v4.67.0 (signed by HashiCorp) Terraform has created a lock file .terraform.lock.hcl to record the provider selections it made above. Include this file in your version control repository so that Terraform can guarantee to make the same selections by default when you run "terraform init" in the future. Terraform has been successfully initialized! ... -
Chạy lệnh trên xong, thư mục
.terraformvà.terraform.lock.hclsẽ được tạo
Xây dựng các module
Ta sẽ xây dựng các modules trong thư mục modules
Networking
-
Networking trong bài lab này cần có
VPC,Public subnet,security group,Route tablevàInternet gateway. -
Đầu tiên ta tạo thư mục
networkingtheo đường dẫnmodules/networking -
Sau đó tạo các file
main.tf,output.tf,variables.tfmain.tf
// VPC resource "aws_vpc" "vpc-learning" { cidr_block = var.vpc_cidr_block } // Subnet resource "aws_subnet" "subnet-learning" { vpc_id = aws_vpc.vpc-learning.id cidr_block = var.subnet_cidr_block } // Internet gateway resource "aws_internet_gateway" "gw-learning" { vpc_id = aws_vpc.vpc-learning.id } // Route table resource "aws_route_table" "route-table-learning" { vpc_id = aws_vpc.vpc-learning.id route { cidr_block = "0.0.0.0/0" gateway_id = aws_internet_gateway.gw-learning.id } } resource "aws_route_table_association" "a" { subnet_id = aws_subnet.subnet-learning.id route_table_id = aws_route_table.route-table-learning.id } // Security group resource "aws_security_group" "allow_tls" { name = "allow_tls" description = "Allow TLS inbound traffic and all outbound traffic" vpc_id = aws_vpc.vpc-learning.id // Inbound rules ingress { from_port = 22 to_port = 22 protocol = "tcp" cidr_blocks = ["0.0.0.0/0"] # Allow SSH from anywhere (adjust for security) } ingress { from_port = 80 to_port = 80 protocol = "tcp" cidr_blocks = ["0.0.0.0/0"] # Allow HTTP from anywhere } // Outbound rules egress { from_port = 0 to_port = 0 protocol = "-1" cidr_blocks = ["0.0.0.0/0"] } }variables.tf, khai báo biến được sử dụng trong filemain.tf, giá trị của những biến này sẽ được nhận khi khai báo trongmodule blocks(ta sẽ tìm hiểu thêm ở phần sau của bài lab này)
variable "vpc_cidr_block" { type = string } variable "subnet_cidr_block" { type = string }output.tf, xuất giá trị trong modules ra ngoài để bên ngoài có thể truy xuất sử dụng được
output "vpc_id" {
  value = aws_vpc.vpc-learning.id
}

output "subnet_id" {
  value = aws_subnet.subnet-learning.id
}

output "security_group_id" {
  value = aws_security_group.allow_tls.id
}
EC2
-
Tương tự như module
netwokingở phần trên, ta tiến hành tạo thư mụcec2trong đường dẫnmodules/ec2và tiến hành tạo các filemain.tf,output.tf,variables.tfmain.tf
// EC2
resource "aws_instance" "web" {
  ami                         = var.ami
  instance_type               = var.instance_type
  subnet_id                   = var.subnet_id
  vpc_security_group_ids      = [var.security_group_id]
  associate_public_ip_address = true
  key_name                    = var.key_name

	// Chạy ở máy local sau khi EC2 được tạo
  provisioner "local-exec" {
    command = "echo IP address is ${self.private_ip}"
  }

	// Remote vào EC2 và chạy lần lược các lệnh trong inline
  provisioner "remote-exec" {
    connection {
      type        = "ssh"
      user        = var.user
      private_key = var.key_private
      host        = self.public_ip
    }

    inline = [
      "sudo yum update -y",
      "sudo amazon-linux-extras enable nginx1",
      "sudo yum install -y nginx",
      "sudo systemctl start nginx",
      "sudo systemctl enable nginx"
    ]
  }
}
output.tf
output "instance_id" {
  description = "ID of the EC2 instance"
  value       = aws_instance.web.id
}

output "instance_public_ip" {
  description = "Public IP address of the EC2 instance"
  value       = aws_instance.web.public_ip
}

output "instance_public_dns" {
  description = "Public DNS of the EC2 instance"
  value       = aws_instance.web.public_dns
}
variables.tf
variable "ami" {
  type = string
}

variable "instance_type" {
  type = string
}

variable "key_pair" {
  type = string
}

variable "key_name" {
  type = string
}

variable "key_private" {
  type = string
}

variable "user" {
  type = string
}

variable "subnet_id" {
  description = "Subnet ID where EC2 will be launched"
  type        = string
}

variable "security_group_id" {
  description = "Security group ID for the EC2 instance"
  type        = string
}
Kết nối các modules
-
Trong file
variables.tfta khai báo thêm các biến cho 2 modulesnetworkingvàEC2variables.tf
variable "instance" { sensitive = true type = object({ ami = string type = string name = string key_name = string key_pair = string key_private = string user = string }) } variable "networking" { sensitive = true type = object({ vpc_cidr_block = string subnet_cidr_block = string }) } -
Khai báo thêm giá trị cho các variables vừa thêm vào vào file
terraform.tfvars# Networking Configuration networking = { vpc_cidr_block = "10.0.0.0/16" subnet_cidr_block = "10.0.1.0/24" } # EC2 Configuration instance = { ami = "ami-053a45fff0a704a47" type = "t2.micro" name = "learning" key_name = "learning" key_pair = "~/.ssh/terraform_learning.pub" key_private = "~/.ssh/terraform_learning" user = "ec2-user" } -
Sau đó khai báo các modules và thông tin cần thiết cho chúng tại file
main.tfresource "aws_key_pair" "deployer" { key_name = var.instance.key_name public_key = file(var.instance.key_pair) } module "networking" { source = "./modules/networking" // vpc_cidr_block, subnet_cidr_block đã được khai báo trong modules/networking/variables.tf vpc_cidr_block = var.networking.vpc_cidr_block subnet_cidr_block = var.networking.subnet_cidr_block } module "ec2" { source = "./modules/ec2" ami = var.instance.ami instance_type = var.instance.type subnet_id = module.networking.subnet_id // từ output.tf của modules/networking security_group_id = module.networking.security_group_id // từ output.tf của modules/networking key_name = var.instance.key_name key_pair = file(var.instance.key_pair) key_private = file(var.instance.key_private) user = var.instance.user }
Triển khai hệ thống
-
Vì cấu trúc của bài lab đã thay đổi, nên ta cần phải init lai workspace
terraform init -
Sau đó ta chạy lệnh sau để format lại code và validate các file cấu hình của cơ sở hạ tần
terraform fmt terraform validate -
Ta kiểm tra các thay đổi trước khi triển khai hệ thống lên Cloud
terraform plan -
Kiểm tra lại các thay đổi đã được log trên console, nếu không có lỗi gì thì tiến hành tạo resource trên Cloud
terraform apply -
Trong quá trình tạo nếu bị lỗi sau, có nghĩa key pair đã tồn tại nên không thể tạo được nữa
╷ │ Error: importing EC2 Key Pair (learning): InvalidKeyPair.Duplicate: The keypair already exists │ status code: 400, request id: 6d8e71ea-7cc1-465e-b9cd-69f29de44a6c │ │ with aws_key_pair.deployer, │ on main.tf line 24, in resource "aws_key_pair" "deployer": │ 24: resource "aws_key_pair" "deployer" { │ -
Ở đây ta có thể vào account AWS để xoá key tồn tại, sau đó chạy lại lệnh
terraform apply. Cách thứ 2, ta có thể import key hiện có trên AWS vào terraformterraform import aws_key_pair.deployer learning -
Lúc này trong file
terraform.tfstateta sẽ thấy resourceaws_key_pairđược tạo ra, chạy lại commandterraform planđể kiểm tra thay đổi, sau đó chạy commandterraform applyđể triền khai hệ thống lên Cloud.Apply complete! Resources: 1 added, 0 changed, 1 destroyed. Outputs: instance_public_ip = "3.85.54.84" -
Truy cập vào IP ở trên ta được kết quả như sau
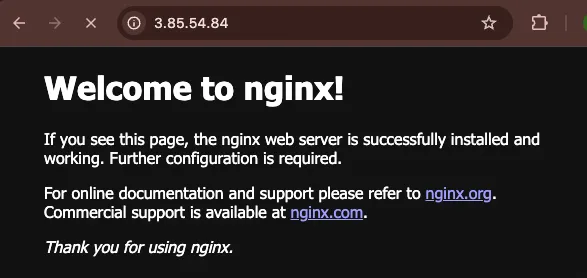
-
Sau khi hoàn thành ta tiến hành xoá hết các resource vừa tạo
terraform destroy
Kết luận
- Qua bài lab này, ta đã biết được cách xây dựng cấu trúc thư mục Terraform đơn giản.
- Nắm được các bước để triển khai cơ sở hạ tầng bằng Terraform.
All rights reserved